Tuesday, February 18, 2014

PEEEESSSTOOOOO.....

This isn't going to be a pretty post...I just wanted to get this recipe down before it escaped my brain. I hope you try it and enjoy it as much as I have.

Paleo Chicken Bacon Pesto
Ingredients

  • 2 chicken breasts (I used leftover grilled chicken)
  • 1/2 lb bacon (I used Applegate's Turkey bacon)
  • 1 C. tomatoes, chopped (I used canned organic, drained)
  • Zucchini noodles or spaghetti squash, cooked to preference
  • Pesto (see below for recipe)
Process
  1. In a large saute pan, sweat bacon then allow to crisp slightly. If using pork bacon, drain and remove all but 1 Tbsp of the grease from the pan. 
  2. Add tomatoes and deglaze pan. 
  3. Add pesto, mix thoroughly with tomatoes and meat mixture. Allow to heat through and loosen up a little.
  4. Mix pesto/meat mixture with hot zoodles allowing the moisture from the zoodles to loosen the pesto a little further.
  5. ENJOY!!
Paleo Pesto
Ingredients
  • 2 C. fresh spinach leaves, well washed and dried
  • 1/2 C. raw pecans
  • 1/2 C. roasted, unsalted cashews
  • 1 tsp. dried parsley
  • 1 tsp. dried basil
  • 1.5 tsp minced garlic (approx. 3 cloves)
  • 2-3 Tbsp extra virgin olive oil
  • 1/4-1/2 tsp sea salt
  • 1/4 tsp black pepper
  • 1/4 C parmesan cheese (optional, I can't do dairy but my boyfriend can and he liked it)
Process
  1. Put all ingredients in a food processor and blend until smooth.

Sunday, November 24, 2013

Pumpkin....

It is that time of year...a million pumpkin recipes emerge onto the interwebs and we all start drinking and eating pumpkin like it may never ever grow again. So...in light of the season...here is my contribution to the pumpkin season.

Maple Pumpkin Granola

  • 1 C. Almonds, sliced
  • 1 C. Almonds, chopped (I just use whole almonds and throw them in the food processor and pulse a few times)
  • 1 C. Pecans, chopped (again, pulse whole pecans in food processor)
  • 3/4 C. Pumpkin seeds (pepitas)
  • 1 C. Coconut Flakes/Slivers (not the powdery stuff...the bigger flakes)
  • 1/4 C. Coconut flour
  • 1/2 C. Pumpkin puree
  • 1/3 C. Maple Syrup (the real stuff, not pancake syrup)
  • 3 Tbsp. Coconut oil, melted
  • 1/2 tsp. vanilla extract
  • 1 tsp. Pumpkin Pie Spice
  • 1/2 C. Dried Cranberries, optional
  • 1/2 C. Chopped Dates, optional 

  1. Preheat oven to 325 degrees.
  2. In a large bowl, mix the first 11 ingredients together until well mixed and all nuts are coated.
  3. Spread mixture evenly onto a parchment lined baking sheet. Bake for about 15 minutes, stirring about half way through, or until golden brown.
  4. After removing from oven, mix in cranberries and/or dates, if using. Allow to cool for an hour or longer before putting into a air tight container. Granola will harden as it cools.
Note: My son is allergic to cinnamon, so we leave out the pumpkin pie spice. Feel free to modify as needed for your own health concerns. You can also use any nuts of your preference, as long as they equal 4 cups of nuts.

Enjoy!


Saturday, November 2, 2013

Red all over....

So a while back I started making my own ketchup. I had had enough of searching tirelessly for ketchup that didn't contain ridiculous amounts of sodium, HFCS (high fructose corn syrup), red dye (WTH? it is made from tomatoes...is this REALLY necessary), insane amount of sugar and various other "natural" and unnatural ingredients.  Even Heinz's "Simply Ketchup" contains the ingredient "natural flavoring". What is that? What other flavor do you need besides tomato, onion, garlic and a little salt and sugar!? What the hell is "natural flavoring"...in KETCHUP!?

Anyway...I digress....I discovered, in my search for the perfect recipe (specifically one that I could make on the sly that the kids would never know it wasn't Heinz) that many of the homemade recipes value the "homemade" taste. Well...in my house...homemade taste means it won't be eaten. I needed to come up with something that tasted like the real thing...but made with real ingredients.  I finally took to the kitchen with a "Top Secret Heinz" recipe and modified it...cuz that's what I do...I modify other people's perfectly good recipes into something I feel good about giving my family. So here it is...the super secret (not really) Faux Heinz Ketchup recipe. Super easy...super yummy...and is as close to the real deal flavor as I have been able to get it.

"Heinz" Ketchup

  • (4) 6 oz cans of organic tomato paste
  • 1/2 C honey
  • 2 C distilled vinegar
  • 1 C water
  • 2-4 Tbsp sugar (I use 4, but start with 2 and modify to your tastes. I also use an organic cane sugar)
  • 3 tsp salt
  • 1 tsp onion powder
  • 1/2 tsp garlic powder
  1. Combine all ingredients in a medium/large sauce pan. Make sure to whisk all ingredients until smooth. At this point, it will seem thick enough and like you are done. EXCEPT...at this point...the seasonings will still be grainy and the texture will be all wrong.
  2. Heat over medium heat until it comes to a "boil".  Because of the thickness...it will merely splatter (make sure you have a splatter guard or a lid that you can set mostly over (do not cover completely) so your kitchen isn't covered in ketchup - learned the hard way). Reduce the heat to a simmer (low) and allow to simmer for about 20 minutes...stirring frequently so it doesn't burn to the bottom of the pan.
  3. Remove from heat and allow to cool.  Pour into a clean Heinz bottle so your kids have no idea they are eating a healthier version.
  4. Enjoy life...smile frequently...giggle quietly to yourself as you watch your kids enjoy burgers and sandwiches and fries...with homemade ketchup. :)
This makes about 2 quarts. It is easily halved or quartered. Unless you are a HARD CORE ketchup eater you will not want to attempt doubling as it generally doesn't last long enough. That being said, if you need to make more, or you would like to make a bunch and then jar it and process it properly to keep longer...make batches at the amount listed above OR double the recipe except for the honey...you will want to only increase the honey by half each time you double. IF it is not sweet enough, add 1/4 C of honey at a time to increase the sweetness to your desired flavor.

For a fun alternative:  Heinz has recently come out with a balsamic version of their ketchup...YUM! Sounds awesome! I can honestly say I have no idea what it tastes like but I have heard it is delicious AND I have been dying to try it...sooooo...yes, I made my own. Simply make the above recipe but add 1/4 C of your favorite balsamic vinegar to the mi before the cooking process. IF it is not vinegary enough, add another 1/4 C and allow it to simmer another 5 minutes before cooling.

Enjoy!

Thursday, September 26, 2013

Rice...Rice...RICE.........

Last night I decided we would have sweet and sour chicken for dinner. It is easy enough to make and relatively safe for Paleo eaters and non-Paleo eaters alike. That is...except the rice. I LOVE rice. Jasmine and Saffron rices are my favorite. I could eat both on their own as a complete meal if it didn't destroy my stomach.  Anyway, so I had bought some jasmine rice for the non-Paleo in my house so they would be more likely to sit and have dinner and not complain and then I began to worry that I would not have enough self-control to not eat the rice.  Did I mention...I LOVE jasmine rice. As I stood in the grocery store pining for jasmine rice, it occurred to me that, maybe I could make cauliflower rice instead. Sadly, I don't have any jasmine handy so that was out of the question....but I DO have turmeric....suddenly...I had the perfect solution....Saffron rice!!! Oh the beautiful yellow hue...the delicate smokiness...the almost buttery flavor across the tongue....oh saffron rice...you devil you...how could I resist attempting to make it in a Paleo safe environment...it had to be done...it just HAD TO BE!  The nice thing...now that I have this new found weapon under my belt...my mexican dinner nights will be better for it as well! ;-)  I digress...here is what you came for.....

Paleo Saffron Cauliflower Rice
  • 1 head of cauliflower
  • 2 tsp garlic, minced 
  • 1/4 C. yellow onion, small dice/minced
  • 1 Tbsp grass-fed butter
  • 1 Tbsp coconut oil
  • 1/4 tsp turmeric
  • Pinch of saffron threads, crushed between your fingers (approx. 1/16 tsp)
  • Salt, to taste

  1. Rinse cauliflower head and rough chop into florets.  Place florets in food processor and process on low or pulse until the consistency of rice kernels.
  2. Heat butter and oil together in a large skillet.  Add onion and garlic and sauté until translucent.
  3. Add cauliflower rice and stir to coat the “rice” with the butter/oil.
  4. Add turmeric and saffron, and salt. Stir to combine.
  5. Cover and allow to cook for 5-10 minutes, or until “rice” is tender.
  6. ENJOY!


Oh how I wish I were a better photographer or had a better camera. Whatever though...you get the point...it is yellow rice...and it is DELICIOUS!!! :)

Wednesday, September 4, 2013

The hidden truth...

I have a confession. My family hates vegetables. No, seriously...hates. Of the 5 people who live in my household, 1 (me) will happily and willingly eat vegetables on a regular basis. So much so that I was vegan at one point. Sadly, except for the youngest who will dabble in veggies and the man who will eat the occasional salad, I am left to eat the veggies alone. Or so they think. ;)

The truth...I have been hiding vegetables in their food since before they knew they were eating food....and tonight was no different. Tonight...we had sloppy joes! Mmmm...sloppy, meaty goodness (shhh, and veggies). So here is how this works...I make something like sloppy joes or spaghetti or chili and I mince the veggies up so fine that even if they can see them or find them, they can't pick them out and they can't really taste them. Tonight's sloppy joes are a perfect example. The spinach and carrots are visible, there is no getting around it - they are bright colors. BUT, you can't taste them. You can't feel their texture. It is the perfect indulgence. In order for this to work though, you need a food processor, blender, or hand blender (or be super amazing at mincing veggies).  Remember to always hide the evidence as soon as possible! ;)

Made Right Sloppy Joe
  • 1 lb ground beef
  • 1 small onion, diced
  • 1 large carrot, minced
  • 2 C spinach, minced (should equal about 1 cup when it is all chopped up)
  • 1-1.5 C. Homemade ketchup (or your favorite organic ketchup. I use this recipe but sub honey in for the corn syrup and omit the sugar, tastes awesome)
  • 1-2 Tbps Yellow mustard
  • 1/4 C. Mayo (or egg-free it with Veganaise like we do)
  • 1 Tbsp "Leah's" seasoning salt (see below for recipe)
  • 1 Tbsp Olive oil, coconut oil, talo, lard, bacon grease (whatever you prefer to saute in)
  1. Heat oil in large saute pan, cook the onions until translucent. 
  2. Add ground beef and brown, seasoning with seasoning salt.
  3. Add minced carrot and spinach and allow to simmer for about 3-5 minutes, stirring frequently.
  4. Add ketchup and mustard and let simmer for another 3-5 minutes. 
  5. Remove from heat and add the mayo.  At this point it should be pretty close to the consistency that you would expect of sloppy joes. If not, taste and decide if it needs more "tangy-ness" (add mustard), more tomato (add ketchup), or more creamy/sweetness (add mayo). You can also adjust seasonings here, although I have never needed additional seasoning.
We like to eat it on a bed of lettuce but for those who eat bread or have some of their favorite gluten free or paleo bread...yummo...have at it! :)  Also, I tend to double this recipe in my house to feed everyone and still have leftovers for lunch. It is really pretty good reheated or even cold.  It is hard to get a good picture of it because I don't have a great camera...plus...it isn't they prettiest stuff. But trust me...it tastes awesome!

Enjoy! Reap the benefits of your family FINALLY eating their vegetables...even if they have NO idea!

**Leah's Seasoning Salt

  • 1 Tbsp salt
  • 2 tsp brown sugar
  • 1/2 tsp paprika
  • 1/4 tsp turmeric
  • 1/4 tsp onion powder
  • 1/4 tsp garlic powder
  • 1/2 tsp chili powder
  1. Combine ingredients and store in an airtight container until use. (PS: I usually make HUGE batches of this...it doubles, triples, etc. very well.)

Tuesday, September 3, 2013

The egg-free breakfast...

Okay, this is an issue I run into alllllll the time. What the heck do you feed someone at breakfast who can't eat eggs!? I mean, com'on...it is the quintessential breakfast food! It is the breakfast food to end all breakfast foods (unless we are talking about bacon and then, well, there just is no comparison...but besides bacon). So what do you feed a child who can't eat grains, eggs, soy, milk, yogurt, or any known "normal" breakfast food? Well, the lovely lady over at The Girl Who Went Paleo has come up with the PERFECT solution. It is grain free, it is egg free, it is dairy free, it is A COOKIE!!! What kid wouldn't give his right eye to be able to eat cookies for breakfast!!??  This is a MUST try recipe, for any who care about my opinion on the matter. I did modify this slightly to accommodate our needs, as usual, but the modifications were super minor so take them or leave them.

  1. I used about half the amount of honey.   I made them to the recipe the first go around and felt the honey overpowered things and made them too sweet. About half was perfect for me.
  2. I removed the pumpkin pie spice (or cinnamon).  My son is highly intolerant to cinnamon so it was a bad call for me to put it in the first batch...needless to say I was forced to eat those all by myself. (It was torture but I took one for the team because my mom always taught me never to waste food.)
I have to admit, even with the modifications, the cookies are damn good...like super uber good...as in, you should probably plan to double and triple the batch because they are so frickin good you will have a hard time not eating them all in one sitting. And they TOTALLY kick ass with a cold glass of coconut or almond milk.

Oh, and if you happen to be allergic to almonds - no fear. Someone, in the comments of that recipe page has kindly given you the formula for making it with coconut flour instead of almond flour (spoiler alert - use half the amount of flour). 

So there you have it, a super simple cookie recipe that can be used as a breakfast treat or an anytime treat!

Thursday, August 29, 2013

End of Month...

So I work as an accounts receivable rep. It is SUPER exciting work. (*drip drip dripping with sarcasm*)  Especially right now. This is end of month, so we are processing every last invoice humanly possible before we close the month books. I spend HOURS upon HOURS crunching numbers, typing invoices, calling field techs to get their paperwork in so I can repeat the process. This goes on for about 2 weeks before the month finally closes out. Tomorrow is when it closes so today and tomorrow morning are the big pushes. It is tiring. It isn't manual labor exhausting...it is mentally exhausting. I think the repetitiveness and the numbers and the fact that you don't move from your desk for days on end...well...it is just exhausting.

Needless to say, some nights I don't want to work very hard on dinner and other nights, I don't mind putting in a little bit of effort if it means I can have some serious comfort food. Tonight....I just wanted comfort food. Being Paleo, comfort food takes on a new shape, taste, smell, whatever. All I could think of on my way home was beef stroganoff. In my mind I am imagining thick beefy sauce laced with sour cream and mushrooms and onions all poured over a big bed of egg noodles and sprinkled with fresh parsley and a little parmesan cheese. My mouth is now watering just thinking about it...again. Growing up...this was a staple in my house...and I could never get enough of it. I would eat so many helpings you would have to roll me to the couch to let me digest before I could function again. Between this and spaghetti...it is a wonder how I managed to stay a normal sized child.

Obviously, I can't eat beefy deliciousness laced with sour cream (since I can't have dairy) and poured over a bed of egg noodles (because I don't eat grains). So what is a girl to do!? How do I go about having my comfort food...the very thing I need to get me through this difficult dreary end of month evening? Why by golly...I find someone who, in their infinite wisdom has come up with the very answers!!

Here's the thing, I love to cook and I will very often come up with something on my own or modify to make something work...but then there are times when you find a recipe and it is perfection just as it is. So here you go...here is the super awesome comfort dinner from tonight and the links to where you can find the super awesome chefs who created the recipes. Enjoy!


Mad props from one mama to another...mad props! The boy ate 2 helpings and asked for a third and then requested this for tomorrow night's dinner as well!

Since I can't have egg noodles I poured this over top of smashed cauliflower. I have tried many recipes of mashed cauliflower in search of something that came close enough to mashed potatoes that my non-paleo eaters in the house might consider trying them. I have only ever found one recipe that could get the job done. No offense to any others out there but here is my favorite, hands down....and from what I can tell from the empty bowl, the family would agree.

Have a wonderful holiday weekend!! School starts next week for the kiddos...let's see what we can come up with! :)

Wednesday, August 28, 2013

Bork Bork Bork....

I wanna know who started the evil lie that burgers or meatballs or meatloaf or ground whatever needed to have eggs in them to hold them together. Since discovering my son's egg allergy I quickly realized that these things do NOT require egg to hold them together. As a matter of fact, a lot of things can be made without eggs to hold them together. Burgers and meatballs and meatloaf in particular though contain plenty of fat and
meaty goodness to hold everything together. You aren't baking a cake you are cooking meat - leave the eggs in the fridge.

As you can tell, today's recipe is all about meat. Now, I realize this is no big revelation to make a burger without egg (for some people who already know the secret that they don't need them) but these burgers will BLOW YOUR MIND!  No, seriously, they are pretty awesome.

Bork Burgers

  • 1 lb. ground bison (Note: Buffalo will also work since, in America, we use these terms interchangeably.)
  • 1 lb. ground pork
  • 2 Tbsp. Special Spice Blend (see below)
  1. Thoroughly mix together in a large bowl.
  2. Grill or broil until cooked through and juices run clear. (Please remember you are working with pork...don't under cook these.)

Special Spice Blend
This can be made in bulk and kept in a cabinet to sprinkle into anything you want. It is a perfect seasoning salt. This has replaced Lawry's for our household.  Simply mix all of the ingredients together in a bowl then transfer to your favorite spice container.

  • 1/2 C. Paprika (I used smoked, but a sweet paprika would work as well.)
  • 1/2 C. brown sugar
  • 1 Tbsp kosher salt, finely ground
  • 1 Tbsp mustard powder
  • 2 Tbsp chili powder
  • 2 Tbsp garlic powder
  • 2 Tbsp onion powder
  • 2 Tbsp ground cumin
  • 1 Tbsp ground black pepper
  • Cayenne, to taste (optional)

Okey Dokey...enjoy! :)

Monday, August 26, 2013

Egg Free Paleo...

I suck at blogging. Seriously, I can't seem to keep up with writing blogs on a regular basis. I don't know how other people do it. I constantly think that I would like to start a blog, I started this one. I think, "I'm going to do better this time." I don't. I fail to open my laptop on nights I'm exhausted or the night gets away from me....or something really great is on TV or a good book keeps calling my name. I guess the fact that I am not a good blogger makes me a novice at that too. Wow...I really did well at picking my blog name.

Anyway, someone the other day told me I should start writing down my Paleo recipes. Many Paleo recipes contain eggs. My son is allergic to eggs so I am forced to modify most recipes pretty extensively and in many cases simply scratch the whole thing and figure it out on my own. There are probably many others like myself who love eating Paleo but have trouble with the mass quantity of eggs that seem to be consumed.  Don't get me wrong, I am not allergic to eggs. I will often have a hard cooked egg for breakfast on the go. But for dinner and weekend breakfasts and lunches...well...I gotta be able to feed my kiddo safely.

Tonight I will begin, hopefully, the journey of bringing you my novice approach to Paleo eating but more specifically, Paleo eating without the eggs. Let it be known, there are many occasions I have to "cheat" on the idea of Paleo for this to work - don't be a hater, I am doing the best I can. Also, as previously mentioned, I suck at blogging - there could be weeks between blogs - don't be a hater, I am doing the best I can.  Oh and yes, I know I am using other people's recipes - I will give credit where credit is due, promise. My inspiration recipes come from wonderfully creative people who are FAR better bloggers than me. I will attempt to do better just for you though. So, with no further ado, here is your first recipe and one of our favorites in my house.

Egg-Free Paleo Chicken Nuggets (with Honey Mustard Dipping Sauce)
Modified from original recipe posted by: The Domestic Man

For the Chicken:

  • 2-3 lbs chicken breasts, cut into 1/2'-1' cubes (or the closest thing you can get - chicken breasts aren't square, I get it)
  • 1/4 C. dill pickle juice
  • 2 Tbsp (or 1/8 C) coconut milk (not the stuff from the can, the stuff from your fridge)
  • 2 Tbsp (or 1/8 C) favorite egg-free mayo (I use Veganaise Soy-Free - light green top*)
  • 1/4 C. Arrowroot flour/starch
  • 2 Tbsp Almond/Coconut flour
  • 1 Tbsp Paprika
  • 1 tsp salt
  • 1 tsp pepper
  • 1/2 tsp garlic powder
  • Dash of cayenne - to taste
  • 1/2 - 3/4 C coconut oil or lard (or oil of choice - like bacon fat, for realz YUM - mix in some coconut oil to help the smoke level) for frying
  1. Place chicken in a gallon ziplock bag and add the pickle juice. Allow to marinate in the fridge for at least 1 hour. (I only did 1 hour and I was super impressed with the results but feel free to go longer if you want.)
  2. After marinating, pour out excess liquid/pickle juice.
  3. Add coconut milk and egg-free mayo to the bag and mix and squish around to coat the chicken. Allow to rest for 5 minutes.
  4. While it is resting, in a separate bowl, mix together your dry ingredients in a small bowl.
  5. When your 5 minutes are up, pour out excess liquid. (I did a kind of squeeze action here over the sink so it wasn't too soupy but it should be wet and look creamy-ish.)
  6. Add the dry ingredients to the bag and squish and mush and wiggle and massage and shake and repeat until all of the chicken is coated.
  7. Heat your oil/fat in a frying pan.
  8. Fry the chicken pieces in batches - do not over crowd the pan - approximately 2-3 minutes per side, until golden brown and crispy.
  9. Remove to a paper towel to drain excess oil.
  10. ENJOY THE HELL OUT OF THESE!!! Dip in mustard sauce that follows!
For the Honey Mustard Dipping Sauce
  • 2 Tbsp Favorite Honey Mustard
  • 1/2 Tbsp Yellow Mustard
  • 2 Tbsp Veganaise
  1. Mix together and enjoy!

*NOTE: Yes, I do realize that Veganaise contains rice syrup and pea protein.
And yes, I realize that rice is a grain and pea protein comes from a legume. And yes, I realize that grains, including rice, and legumes are no-nos in the Paleo lifestyle. Let me say a few things to this: 1) If you are looking for egg-free recipes, you likely already know how incredibly difficult it is to find and egg-free mayo that is truly Paleo safe...this one is the closest I have ever found. 2) If you have never tried to find an egg-free mayo that is Paleo safe and you are going to judge me for using this, I suggest you give it a go for yourself and let me know what you find. 3) If you have found a Paleo safe, egg-free mayo - FOR THE LOVE OF ALL THAT IS GOOD IN THIS WORLD...SHARE!!!  

I would also like to point out that Veganaise is non-gmo...which to me is more important at this point than finding something that may be completely Paleo compliant but potentially has gmos. So there...be a hater if you like, but this is as good as I could get...but again, if you have found one better, please let me know what it is.

So there it is. Your first, egg-free Paleo recipe. Hopefully there will be many more to come! Enjoy! :)

Tuesday, May 14, 2013

Pumpkin Burgers

So, along with being a novice at everything else, I am also a chef...of sorts. I graduated from culinary school in 2011. Since then though, I have done little with my culinary knowledge except make random creations in my own kitchen for my family who would prefer to eat out than to try my food...or any food really...not just mine...they are SUPER picky eaters. Buuuuutttt....I keep cooking for them, because, well, I love to cook just as much as I love to garden.  So here is a creation I came up with this evening. The measurements are a bit rough because I forgot to write it down as I went...so modify as needed. Sadly, I'm sorry, I don't have a picture because I ate them all before I realized that I should have taken a picture of them. *shrug*  Sorry...they were good! :)

Pumpkin Burgers

3 lbs ground beef
1.5 C pumpkin puree
1 t. onion powder
2 t. black pepper (and a pepper shaker handy)
1 t. sea/kosher salt (and a salt shaker/pig handy)
½ t. worchestershire sauce
½ t. pumpkin pie spice (and the spice shaker handy)
1 t. bbq spice rub seasoning (see separate recipe)
Garlic powder
(feel free to adjust seasoning amounts to taste)

1) Combine all ingredients in a bowl. Mix well with hands. Form patties.
2) Sprinkle tops of burgers with black pepper, salt, garlic powder, and a hint of pumpkin pie spice.
3) Broil under broiler or grill to preferred doneness.

Pumpkin Mayo

3 T. Mayo (or vegan mayo of your choice - I used Veganaisse)
1 T. pumpkin puree
¼ t. honey (or to taste)

1) Wisk all ingredients together.

BBQ Spice Rub Seasoning  (this recipe can be made and saved for later use)
1/4 cup paprika
2 T kosher salt, finely ground
2 T sugar
1 T mustard powder
2 T chili powder
2 T ground cumin
1 T ground black pepper
2 T granulated garlic
1 T cayenne (or to taste)

1) Combine all ingredients and store in air tight container/spice shaker.

Enjoy!! :)


Sunday, May 12, 2013

Composting...

Last weekend I amended my garden with my very won compost for the first time since I started the compost bin last summer. The compost bin seemed to be doing well since I discovered tomatoes and squash both growing from it.  I figured that was a good sign it was ready. So I popped the bottom trap door for the first time and discovered the most precious, most amazing black gold I had ever seen. Why was it soooooo amazing....well simple silly....because I HAD MADE IT!!

Anyway, I threw a couple of buckets full into the garden before throwing the starts in and well...I am sold...this stuff is the best! If you haven't done it yet...start a compost bin, it will AMAZE your plants and make them super happy.  Needless to say, the pathetic little starts that I feared would not survive the transplant....are thriving in the newly amended compost garden. YAY COMPOST!!!

Today is Mother's Day. Did you notice? Did you tell your mom how much you love her? Send her flowers maybe? I called my mom and wrote on her Facebook wall (I know, cheese). My step-mom didn't answer her phone so I left her a message. And my "mother-in-law" (that's in quotes because her son and I aren't "legally" married) I created a planter box and gave her a card. I know...seems like I did more for her than my own mom but in reality it was just proximity. If my mom had been closer and not in Denver, she would've gotten one too. As it is, it was too large to ship. ;-)   Anyway, I bought a standard issue wooden box, painted it black and stenciled it with pretty flower stencils then put a trellis in and some star jasmine, some little yellow native Oregonian flowers and some purple grass. All in all, I think it turned out spectacular! I want to create one for myself actually...and I just might at some point.

In the meantime, I painted some terra cotta pots the same black and used the same stencils and I will use them to create my flower tower near my bird bath. Which is also still a work in progress. I should post pictures, huh. Ok, ok...twist my arm. Here come some pictures at ya!
The new garden fence and arbor. This will all look MUCH cooler when there is new ground cover in the front and veggies all green in the garden.
The Mother's Day planter box.

Flower detail

My new pots...these will also look much cooler when they are in place as a tower and planted with pretty flowers....promise!


Saturday, May 4, 2013

The Discovery...


So I realized today, as I was cleaning my garden, putting up a new fence around it and an arbor that, in fact, I am a novice at most things in life. I think I need to change the focus of this blog to all things I am novice at instead of just my garden. The reality of it is that I am a novice at life in general. An example:

When you are growing up, frustrated and angry at your parents for all the horrible things they have done to you you begin to form ideas about what type of parent you will eventually be. As you get a little older you may become a little wiser and understand some of the things your parents said and did and you begin to adjust your ideas about what type of parent you will be. Then one day you realize that all of the things you had hoped to teach a child, all of the dreams you had hoped to share with this young mind, all of the lessons you thought you would lay foundations with so they could one day become the smart, independent, loving, compassionate people you had always dreamed of...all of those things are useless. All of those things will likely not come to fruition, at least not from you. All of the love you have for this young person must be censored and held back for their comfort.  This fateful day...is the day you become a step-parent. 

There is nothing quite like the feeling of finding love for a second time. Having that moment of realization that you will not die a lonely old cat lady, alone in your apartment, only to be discovered when the smell gets too bad for your neighbors not to mention something. It is really quite a wonderful feeling. Then you meet his children and you think, "I am the luckiest person in the world!!"  Not only is this man perfection wrapped up in a super sexy body but his children are the sweetest little angels. You couldn't have gotten better children if you had hand picked them. You have found an instant family to love and be loved by. It is pure bliss. And then you combine homes, move in together....everyone...under one roof.........you are a step-parent.

Now don't get me wrong, I love these kids more than I EVER thought possible to love someone else's children. I am bursting with pride when they succeed at something and angry and frustrated with them when they do something wrong that I'm sure they know better. They are super smart kids and incredibly well behaved...for teenagers. They have a level of respect for other children and other adults that is almost unprecedented at their ages...almost.

Buuuuutttt (yeah, you knew it was coming)...there is a line that can never be crossed with your step-children. An understanding that must be upheld and never spoken about. You.are not.their parent. Period.  This is ever so much more apparent and important if you happen to move into THEIR childhood home with them. It is then, not only understood that you are not the parent but that your rules, lessons, well...anything...counts for very little. This is THEIR home first and yours only once they have succeeded in graduating high school and moving OUT. It doesn't matter that your stuff is the stuff they sit on, eat with, walk around, use each and every day. It does not matter that you repainted every room in the house, planted flowers, trees, a garden. It does not matter that you make them dinners, lunches, breakfasts, do laundry, clean up after them. These things are irrelevant. I am sure there is a time when this changes....after 3 years I have not gotten to that point yet. Hence...I am a novice at being a step-parent. Add to the confusion...me and my "spouse" are not actually, legally married........ever increasing the confusion of my role in this whole picture, I'm sure.

For reference...there are no handbooks, no manuals, no guides in this journey. Each family is different, each child their own. No matter how many blogs or support groups or books you may read or be a part of, NO ONE can really truly identify with the struggle you are dealing with in your combined families. All I can say is that it is a fine line we, as step-parents, must walk. I often think back to my own step-parents and thank them for the lessons they taught me...the ones I never imagined I would ever need....until I ended up walking in their shoes.

No matter what though, I see these kids as my own...maybe not my blood...but they are mine to keep safe and love and adore and cheer for and drive all over the place...and occasionally drive crazy. Alas, I must do it from the sidelines of their life. I am only allowed in as far as they will permit, when they permit. I wait for my signals that I am allowed to come closer and relish in the brief moments they open their hearts to me.  No matter what, I will forever be there for them. I will forever keep them in my heart and in my mind and I will forever try to be what they need me to be to them when they need me to be it. And I will forever, likely, struggle with not knowing how to function in their lives and in my own house while they are around. I can only hope it gets easier eventually. That the walls come down a little and windows open a little and doors of opportunity present themselves so that I can celebrate their lives with them.

Tuesday, April 24, 2012

The Waiting...ugh...

So we discovered in a past weekend that although I am capable of laying down pavers...I will never have a side job doing this job. Thankfully, mine are holding up quite nicely so far and I have not had to fill in with more sand...I think I did O-K (even if they are HORRIBLY uneven).

This past weekend we had the most amazing Oregon weekend yet this year with 75-80+ degrees both days. The Farmer's Almanac stated that Saturday was not a good day to plant...so I waited, like a good little girl and did my planting on Sunday which was supposedly an ideal day to plant. I am not sure what they know that the rest of us don't but I have heard great things about their ability to predict these things...so I listened. As soon as I was able on Sunday though...I planted corn, green beans, snow peas, radishes, and carrots straight into the garden. I figure, being this is attempt #2 at truly gardening, I will continue to test my abilities to start from seeds.  My starts are still looking quite nice in my window, inside.  I am encouraged by their growth...they all seem very happy so far.  I am hoping this continues for a bit longer so I can get them into the garden soon.


My son's view garden is doing very well also. The pictures of the roots aren't great due to glare from the plastic but you can see what has grown above ground and they are doing very well.


I also threw a ton of steer manure (already composted and ready for garden) into the garden to supplement the soil. It seems there is some dark underground source that sucks the soil from your garden each year......I always wondered what the need for compost was. (Okay, not really...I know it all compacts and continues to compost and yadda yadda.)  I am considering building a composting bin later in the year to try my hand at composting. It seems like a LOT of work...and I am concerned I don't have enough time in the day for all of these projects that I need to keep up with. I will continue to ponder that idea though. I rather like the idea of food scraps being in the compost bin and not in my trash can.

Since I wasn't allowed to plant on Saturday I made some hummingbird food and filled my bird feeders. I also set up my vertical "walls" in the garden for when the starts come out so they have something to grow on. I have decided, after reading some more on vertical gardening, that I will need to create about 4 more vertical walls for all of my vine type plants. According to readings it is easier to garden this way, the plant yields more crop, and you deal with less pests. I would be happy with 2 out of 3 of those! Sadly, I forgot to take a picture of those...I will do so once I get the next 3 or 4 in and you can then see the whole set up.

So, I also started some strawberry seeds because Lowe's had the cutest little strawberry garden set thingy for super cheap and it matched my herb garden thingy in my kitchen window and I just couldn't resist. *sigh*  So I have now added strawberries to the list of fruit and veggies.

And to round it ALLLLLLL out, because I am pretty certain I have some sort of addiction issue now, we bought a peach plum tree (it was a fundraiser for the kid's baseball team...how could I not) that we will be planting out front. I am super excited about it actually. We have a spot in the front that I had yet to figure out how to landscape it properly and the tree was the perfect starting point. As soon as I realized I wanted it there, the rest all seemed to suddenly make sense.

So here is the list of our eatable plants around the house this year:
Peach Plum tree
Apple trees (2)
Cherry tree (although it doesn't produce fruit we can get to...it is about 40 tall)
Corn
Green beans
Snow peas
Radishes
Carrots
Strawberries
Lettuce
Cucumbers
Tomatoes
Watermelon
Lemon Basil
Mint
Parsley
Chives
Saffron
Sweet Squash (holding for a later planting)

and some volunteer blackberry...because I live in Oregon and the stuff is EVERYWHERE whether you want it or not.

I will likely grab some starts from the garden center later this spring of peppers since they didn't work out last year. I still really want to see if I can get them to work this year though. I may even grab some spicy peppers so I can make salsa with just my garden stuff.

I am still quite in shock that my garden can handle it all...but it seems I built it just the right size to handle my insanity! :)  So until next time....


Wednesday, April 18, 2012

YAY for Spring!!

So last weekend was a beautiful gardening weekend here in "sunny" Oregon. We had perfect weather for being out and about and playing in the dirt. I finally had some time to put work on some projects. I decided this year to really try my hand at some flowers since I had bought flower boxes at an end of the summer garage sale. I painted hem to match the trim of the house and filled them with clematis and other things...honestly, I have no idea what is in them...they are pretty, that is all I care about. I also cleaned up all my other planters and put in some new perennials so that hopefully, if I can keep them somewhat alive this year...they will come back all on their own next spring. *fingers crossed*  All I can hope is that as the growing season continues, they will grow and flower and fill the front area beautifully.  Again *fingers crossed*


While at dinner on Saturday evening I got to talking with a local bartender who is also a gardener and I told him I was attempting my second year of growing. We started talking about pests and I told him my greatest issue last year were the slugs. OH those disgusting slimy things. Sadly...although you can kill them with salt...you will also kill any plants that may be close by. This wonderful bartender informed me that you can use copper as a type of barrier. Much like salt, the copper reacts to their slim and they refuse to go near it. SO, DUH...I purchased a TON of copper tape!! Do I look crazy!? I lined the tops of the planters in the front and I lined my garden beds out back. This year...I will have control!!! I also laid pavers in the garden to help ease the growth of weeds and my tracking of mud through the house.


So there it is, my full gardening weekend. When the rain subsides again for another weekend day, I hope to plant a few select seeds, corn, radishes, carrots in hopes of getting them started. I may even see if I can get the beans started a little early so I can do 2 crops. I will also be putting up the wire mesh walls that the beans and tomatoes will grow up this year. Stay tuned!! :)

Thursday, March 29, 2012

Spring...Glorious Spring!

So as I mentioned in yesterday's post, I have much to tell you. Sadly, the rain is still falling and falling in buckets, so I have not been allowed to play in the dirt much. As I showed yesterday though, I did get my starts started so they would be ready for when the sun finally comes out. My son and I have been having some fun as well with a product I found here: http://www.thinkgeek.com/geek-kids/3-7-years/e9d4/?pfm=Search&t=root%20vue  We love us some ThinkGeek.com and I couldn't resist when my favorite geek website introduced a gardening "toy" for my kiddo. The Root Vue Farm is a bit pricey considering what you get but it is a PHENOMENAL way to get your kids into gardening and all the wonderful things that happen when you plant a seed. I have to admit...I am equally as excited each morning as we pull the viewing shield away to reveal how much our little roots have grown.  Excitingly, the radishes sprouted almost immediately and began to grown loooooong roots. The carrots and onions took a bit longer to sprout but have successfully started to grow and show roots in the root viewer.

All in all, we are pleased with their progress and now my little man can see what is happening to all of my starts right now. No more mystery under the soil....the magic has been REVEALED!! (Muahahahahahahaha!!!)


I will continue to update you on our wee sprout's sprouts as they grow! So stay tuned!!! :)

Wednesday, March 28, 2012

It is beginning....

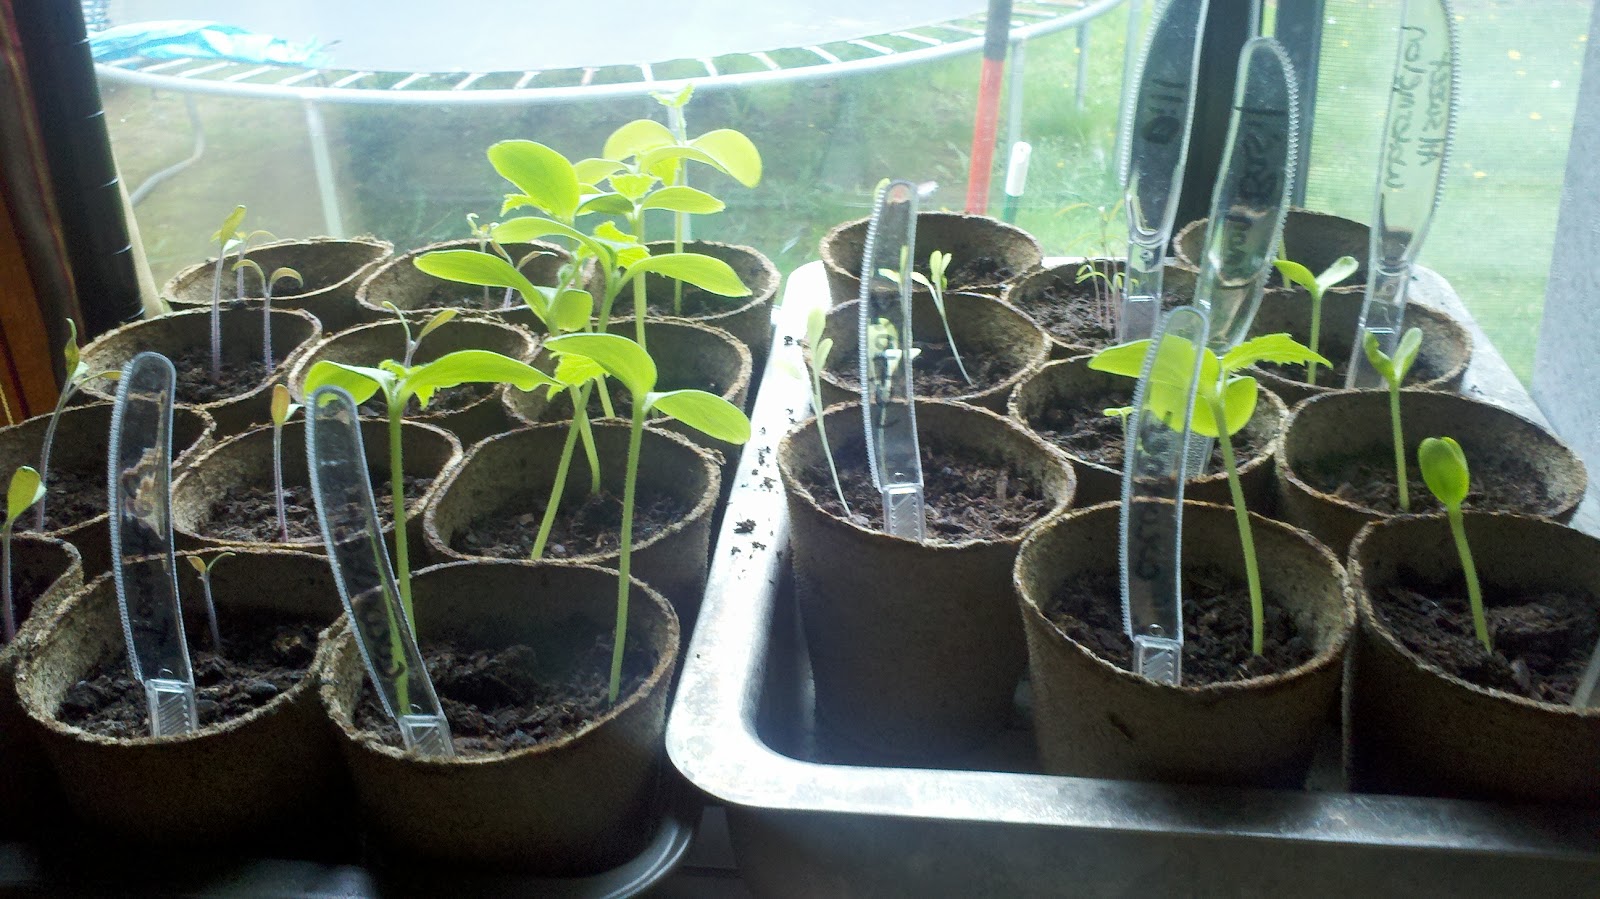
Oh man...so much has happened this month in the way of gardening! I wish I could remember to post more often. I am hoping I get better at this. Anyway, gosh where to start...OH RIGHT...my starts...I actually did get them started:

I used those seed starter pots that let you just put them right in the ground instead of unpotting them. And to label the pots I used old plastic knives we had laying around from some party a million years ago and a sharpie. Not terribly sophisticated...but it got the job done. I had considered writing on the outside of the pots with the sharpie but decided not to considering they would be saturated with water a lot of the time. So far...they are doing quite well. Although, I had hoped to see more sprouts by this point but unfortunately, the sunshine has not been terribly cooperative so I am having to rely on cloudshine to get the job done for the moment. I had occasionally stuck a heating pad under them and they are close to a register for additional warmth. I am confident they will do JUST FINE. (That is me trying to convince myself that I won't have to go out and buy starts in a month or two.)

We did have one lovely sunny day that was around 60 and I was able to get out and work in the garden again to get it prepped and ready for this year a bit more. I cleaned out a few more weeds...yay. And moved the boxes around a bit to bring in some new special friends for my garden this year. I am very excited about this year's turnout for the gardening season. I will be laying down pavers to facilitate me not tracking as much mud into the house this year...I hope and bought 2 apple trees. Yes...I said that correctly...apple trees. Not just any ol' apple tree though. These babies grow in pots. They are called columnar apple trees and they grow up about 4-5 feet and produce apples off the main column/trunk. Here, check them out:  http://www.onegreenworld.com//product_info.php?cPath=1_12&products_id=155  These guys are the best for eatable plants!

As you can see...the paver project is still a work in progress. Sadly, I can't quite count in my head well enough to buy the right amount of pavers and sand that is needed for the size of my new garden so it waits for yet another sunny day for me to finish...my fingers are crossed for this weekend. In the meantime, it is all shaping up to be a spectacular growing season here in Oregon...and in my lovely little oasis in my backyard!


I have big plans for the layout of the new garden this year...stay tuned...more to come!

Happy Gardening 2012!!!

Wednesday, March 7, 2012

Just as a note...

I would like to add to the post from this evening but instead of editing it I will make this a separate thought.

Last year's garden wasn't the giant success I had hoped it to be. It did well for my first year and I was able to see where I needed to improve but all in all the yield was...well...not worth the time, effort, and money put into the whole gardening thing. The experience though...priceless. Plus...I made some awesome Giardiniera with a few of my peppers. I was able to do a ton of canning of berries I bought elsewhere and I pickled my pickles and even pickled my snap peas. I recently got to open one of the Curry Pickles and YUM!!! A must try...really!

So was it a waste...no...the experience and the little bit of yummy food I got out of it was worth all the toil and money I put into it. Plus, this year...I am starting out with what I think is a BEAUTIFUL garden plot to work with.

Happy gardening to everyone this year!!

It's that time of year...

Okay, so clearly...I am not terribly good at keeping up with a blog. Sadly, I am also not terribly good at winter gardening. I can be honest with myself now...winter and me are just not friends...I don't like the cold. This winter, instead of cultivating beautiful fall/winter broccoli and sweet onions and fall spinach...I grew weeds, mushrooms (not any of the good kind) and some slugs. They were all delightful...I found them the other day when I finally uncovered my garden for the first time since the frost hit back in October.

Needless to say, it is finally time to garden again! Which means it is also time to blog again (I promise, I will get better at this).  The first sign that it was time to garden soon...my beautiful orchid baby began to show buds again. I really just don't care what anyone says about orchids mine loves me. I give it plenty of water and it sits in a window with direct sunlight in the afternoon and it grows like a weed! Don't be afraid of your orchids...I give it a good dousing of water about every two weeks, sometimes more often depending on how dry I think the house is feeling or how dry the soil looks. My best compass for my orchid...a bamboo plant sitting in the same window. When the water level drops below the rocks and I need to rewater the bamboo...I water the orchid. They are both happy plants!


As for my garden, I have plans in place...and a new garden decoration that I can't wait to install. Last weekend I cleared all of the mushrooms and weeds. I gave a little love to the one broccoli plant that refuses to give up even though I really tried to kill them all off this winter.  I gave a once over with some sulfur to help reduce the fungus that has OBVIOUSLY (hello...I grew mushrooms) grown in my garden so that when I plant my new foods I am starting with a good strong soil. I also purchased some good organic slug repellent and put some down just to help remind the slugs that this is MY garden...not theirs. I have high hopes for doing my starts some time this week/weekend. Since we are still getting some nasty cold nights I will start them in the house, let them get stronger, and then transplant them in hopes that this year I can plant from seeds instead of more mature plants that I don't know where they have come from.

I made a new friend at the local farm store and I plan to pick his brain now and again. He seems really knowledgeable on organic gardening and based on his potential age has likely been doing this for a while. *fingers crossed*

YAY! For garden season!! Oh...before I forget...I also planted some flowers this year in the front yard area. I have 3 planter boxes and will also have 6 round planters, 2 of which have volunteers from last year already coming back. So, bring on the sunshine and lets see some pretty blossoms and yummy food!!!

Wednesday, September 28, 2011

House Plant Dilema (or a Ghost?)

Soo...I have this plant in my office (I will post a picture at another time...I forgot to take one today while at work...shush...I was busy...with work...I know...WEIRD right!?)...anyway...I had forgotten to water all of the office plants for about the last 2 weeks (I think, I'm not exactly sure how long because I have been VERY busy). Today, I finally remembered and went around with my normal jug but this one plant was literally PLUM FULL of water already.  I'm not just talking wet dirt...I am talking PUDDLE of water...the thing literally splashed water when I went to try to pour more in. (At this point, you are wondering why I would put more water in a full plant...but see, the plant is up high so I just reach up and well...you get the picture.)

ANYWAY...so since all the other plants were relatively dry...where did all this water come from!?

I am strongly considering the possibility of a ghost that has some deep connection to this particular plant but is okay with killing off the others.

My biggest dilemma at the moment is how I am going to get the plant down from its perch, into the kitchen and emptied of its excess water...clearly this is NOT a good thing for this plant to live like this....as far as I know it is not a water plant.

I will keep you posted.

(So it wasn't about MY garden...but I am not good with house plants either...so my clear novice approach on what to do with this will likely come out when I post the update and you learn I have spilled nasty stinky plant water with potting soil onto my office carpet....stay tuned...)

Tuesday, September 27, 2011

The Dilema of Organic

So I kept my pickling cucumber after installing the new garden bed around it. I had every faith that it would survive the installation of the bed around it and the new soil, in my mind, would only supplement the nutrients needed to make FABULOUS pickling cucumbers. Plus, there were two little cucumbers growing nicely and I wanted to see MORE MORE MORE!!!

Okay...phew...sorry...

Alas...the other day I go out and much to my dismay my pretty little cucumber plant had white powder all over its leaves.

I need to take a moment to explain something...I am from the east coast. I have seen many kinds of mold, mildew, fungus, growths, dying plants of various types and from various illnesses (usually my lack of watering but whatever)...I have never seen white powder.  Sadly, I knew what this was because a plant from my office had the same stuff not more than a month earlier. Seems, here in Oregon, white powdery mildew is quite common in these types of vegetables (cucumbers that is).  The worst part...the only real solution...rip it all out.  My heart sank.  Here, I had saved this precious plant from the compost pile only to have it taken over by mildew.

So here is what you do about white powdery mildew...bag the plant (to prevent the mold from spreading to other plants) after which you will RIP the poor unsuspecting baby from its warm, soft bed.  As you shed tears of remorse and regret and frustration...simply close the bag and throw the whole thing away in the nearest trashcan or dumpster. (If you feel it necessary, you might say a few words for your fallen friend at this point.)

THEN...put together a bicarbonate spray (of course I am going to give you the recipe...sheesh)...

Dissolve 1 teaspoon of baking soda and 1 drop liquid soap in 2 quarts of water in a spray bottle. Mix well.  (as described in Rodale's Ultimate Encyclopedia of Organic Gardening) 

You will use this spray to spray your other plants to ensure they don't get the funk.  DO NOT make a stronger concentration...you will burn the leaves of your plants...TRUST ME! There are evidently some premade products on the market (GreenCure)...but I have the above in my kitchen so I thought it would be better...oh, and cheaper.

Alas...I lost one little soldier...but I learned a lot from this moment. Here is the last photo of my beloved's precious leaves before I bagged her!


Rest in peace my little friend.

OH...in case it wasn't obvious...DO NOT put the remains of your dying little friend in your compost...BAD BAD idea. Just sayin'!